Category Archives: Recipes

Summer Bean Salad

Two of my children have summer birthdays, a fact which leaves me constantly on the lookout for great salads that we can serve at family parties!

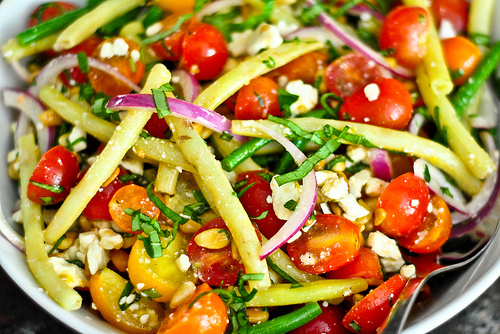
I made this one for my 3 year old’s birthday and it won’t be the last time it makes an appearance.  I had to make a few substitutions based on the produce I  had. I used green beans instead of wax beans,  edamame instead of fava beans, and yellow cherry tomatoes instead of red. I also omitted the chives. Call me a rebel.

But guess what? It was STILL delicious.

Try this one – it’s a lovely way to showcase your farmer’s market finds!


Summer Bean Salad
adapted from My Recipes

serves 4

Ingredients:

3 tablespoons extra virgin olive oil
1 teaspoon grated lemon zest
3 1/2 tablespoons fresh lemon juice, divided
1 tablespoon chopped fresh thyme
3/4 teaspoon freshly ground black pepper, divided
3/8 teaspoon kosher salt
8 cups water
8 ounces fresh yellow wax beans, cut into 1 1/2-inch pieces (about 3 cups) (or green beans)
2 cups shelled and peeled fava beans (about 3 pounds unshelled beans) (or frozen edamame)
2 cups quartered cherry tomatoes (yellow or red)
1 cup very thinly vertically sliced red onion
1 (15 1/2-ounce) can unsalted chickpeas (garbanzo beans), rinsed and drained
1/4 cup canola mayonnaise
1 tablespoon minced fresh chives

Directions:

1.  Combine oil, lemon zest, 2 tablespoons lemon juice, thyme, 1/2 teaspoon pepper, and salt in a large bowl, stirring with a whisk.

2.  Bring 8 cups water to a boil in a large saucepan. Add wax beans; cook 2 minutes. Add fava beans (or edamame) to wax beans in pan; cook an additional 2 minutes or until beans are tender. Drain and rinse with cold water. Drain again.  Add bean mixture, cherry tomatoes, onion, and chickpeas to dressing; toss well.

3.  Combine remaining 1 1/2 tablespoons lemon juice, remaining 1/4 teaspoon pepper, mayonnaise, and chives in a small bowl, stirring with a whisk. Let stand 10 minutes. Drizzle mayonnaise mixture over bean mixture and toss just before serving.


Yogurt Berry Ice Pops

My kids are obsessed with their Zoku popsicle maker. The allure of nearly instant popsicles is like a siren song emanating from our freezer. We are making popsicles ALL-THE-TIME. When we’re talking about 2 oz. of frozen 100% juice and the added bonus of cooking-as-entertainment, I’ll admit that it’s hard (and silly) for me to say no.

But I’m dying for variety. So I found this recipe and thought I’d give it a whirl. It’s a little more effort than just pouring juice into the mold, but totally worth it for an occasional upgrade! And in case you’re wondering, you don’t have to have a Zoku – these work in old school popsicle molds, too! You’re welcome.


Yogurt Berry Ice Pops

serves 8


Ingredients:

1 lemon

1/2 cup water

1/2 cup sugar

1 1/2 cups plain unsweetened Greek yogurt

2 tablespoons honey

2 cups fresh blackberries (or another berry of your choice)


Directions:

1. Rinse, then peel the lemon. (Save the lemon for a different use – we just need the peel.) Combine water and sugar in a small saucepan and stir till it comes to a boil and the sugar dissolves. Add the lemon peel, lower the heat, and simmer for 5 minutes. Cool to room temperature, strain through a fine-mesh sieve, and refrigerate till chilled. (You can do this the night before you want to make them to avoid the chorus of “Is it ready yeeeeeeeet?”)

2. Add the yogurt and honey to the chilled syrup and stir until  combined.

3. Cut blackberries in half and set aside.

4. If using an instant pop maker like a Zoku, gently stir the berries into the  yogurt and freeze according to manufacturer’s instructions.

5. If using conventional molds, put a bit of the yogurt mixture into each of the molds, to a height of about 3/4 inch. Freeze until the mixture begins to set. Add blackberries and remaining yogurt mixture. Snap on the lid and freeze until solid, 3 to 4 hours.

Summer Squash and Ricotta Galette

True confession. I usually do not whip out a galette for a weekday dinner. Promise. But this week, the mood struck, and I had fresh zucchini from my generous neighbor (she of Swiss Chard fame if you follow us on Facebook), and I just had to do it.

A galette, for the uninitiated, is basically a freestyle pie. In other words, yes it’s SUPPOSED to look like that! You roll out the crust, layer on the toppings sort of like pizza, and then fold the edge of the crust over a bit, leaving the middle exposed. Don’t you love how it looks all rustic and farmstand gorgeous?? This is “Tuesday gourmet” at its best.

The crust for this galette is made with olive oil instead of butter, and using a good (aka monounsaturated) fat boosts the health quotient enough for me to serve pie for dinner.

I paired this with a big salad of fresh lettuce, garden tomatoes, and a simple vinaigrette. Per-fect.


Summer Squash and Ricotta Galette

adapted from Cooking Light

serves 6


Ingredients

1 2/3 cups all-purpose flour (I did not use whole wheat – might try that next time)
1/2 teaspoon salt
1/2 teaspoon baking powder
1/3 cup plus 1 tablespoon extra-virgin olive oil, divided
1/4 cup water
1 medium zucchini, cut crosswise into 1/4-inch-thick slices
1 large yellow squash, cut crosswise into 1/4-inch-thick slices
2 garlic cloves, minced
3/4 cup part-skim ricotta cheese
2 ounces grated fresh Parmesan cheese (about 1/2 cup)
2 teaspoons chopped fresh thyme
1/2 teaspoon grated lemon rind
1 teaspoon fresh lemon juice
1/4 teaspoon black pepper
1 large egg, lightly beaten
1/4 teaspoon kosher salt
1 teaspoon water
1 large egg white
1/4 cup fresh basil leaves

Directions

1. Weigh or lightly spoon flour into dry measuring cups; level with a knife. Combine flour, salt, and baking powder in a food processor; pulse 2 times to combine. Combine 1/3 cup oil and 1/4 cup water in a small bowl. With processor on, slowly add oil mixture through food chute; process until dough is crumbly. Turn dough out onto a lightly floured surface. Knead 1 minute; add additional flour, if necessary, to prevent dough from sticking. Gently press dough into a 5-inch disk; wrap in plastic wrap, and chill at least 30 minutes.

2. Preheat oven to 400°.

3. Combine remaining 1 tablespoon oil, zucchini, squash, and garlic in a large bowl. Combine ricotta and next 6 ingredients (through egg) in a medium bowl, stirring to combine.

4. Unwrap dough, and roll into a 14-inch circle on a lightly floured surface. Place dough on a baking sheet lined with parchment paper. Spread ricotta mixture over dough, leaving a 2-inch border. Arrange zucchini and squash slices alternately, slightly overlapping, in a circular pattern over ricotta mixture. Sprinkle zucchini and squash with kosher salt. Fold edges of dough toward center, pressing gently to seal (dough will only partially cover squash). In a small bowl, whisk together 1 teaspoon water and egg white. Brush dough edges with egg white mixture. Bake at 400° for 40 minutes or until golden brown. Cool 5 minutes; sprinkle with basil. Cool an additional 15 minutes. Cut into 6 wedges.